مکانیزم توجه (Attention Mechanism) یکی از مهمترین نوآوریهای دهه اخیر در یادگیری عمیق است که توانسته انقلابی در حوزه پردازش زبان طبیعی و بینایی ماشین ایجاد کند. این مقاله به بررسی جامع مفاهیم نظری، ریاضیات پشت مکانیزم توجه و پیادهسازی عملی آن در PyTorch میپردازد. در این راهنما، انواع مختلف مکانیزم توجه شامل Self-Attention، Scaled Dot-Product Attention و Multi-Head Attention را با جزئیات کامل و کدهای قابل اجرا بررسی خواهیم کرد.
۱. مقدمه و پیشینه
۱.۱ تاریخچه و پیدایش مکانیزم توجه
مکانیزم توجه برای اولین بار در سال ۲۰۱۵ توسط Bahdanau و همکاران در مقاله “Neural Machine Translation by Jointly Learning to Align and Translate” معرفی شد. این مکانیزم برای حل محدودیتهای مدلهای Sequence-to-Sequence مبتنی بر شبکههای عصبی بازگشتی (RNN) طراحی شد.
پیش از معرفی مکانیزم توجه، مدلهای ترجمه ماشینی بر پایه معماری Encoder-Decoder ساخته میشدند که در آن تمام اطلاعات جمله ورودی در یک بردار زمینه (Context Vector) با طول ثابت فشرده میشد. این رویکرد برای جملات بلند و پیچیده با مشکل جدی گلوگاه بردار زمینه (Context Vector Bottleneck) مواجه بود.
۱.۲ انقلاب Transformer و “Attention Is All You Need”
نقطه عطف اصلی در سال ۲۰۱۷ با انتشار مقاله تاریخساز “Attention Is All You Need” توسط Vaswani و همکاران در Google رخ داد. این مقاله معماری Transformer را معرفی کرد که بهطور کامل بر مکانیزم Self-Attention متکی بود و هیچ لایه بازگشتی یا پیچشی نداشت.
معماری Transformer و مکانیزمهای توجه آن پایهگذار مدلهای زبانی بزرگ مدرن مانند BERT، GPT و T5 شدند که امروزه در کاربردهایی مانند ChatGPT استفاده میشوند.
۲. مفاهیم پایه و ضرورت مکانیزم توجه
۲.۱ مشکل اساسی: محدودیت حافظه ثابت
در معماریهای کلاسیک Encoder-Decoder، انکودر باید تمام اطلاعات یک دنباله ورودی را در یک بردار حالت پنهان نهایی (Final Hidden State) با ابعاد ثابت خلاصه کند. این رویکرد دارای معایب عمدهای است:
- از دست رفتن اطلاعات: برای جملات طولانی، اطلاعات ابتدای جمله بهتدریج در حافظه محو میشود
- عدم مقیاسپذیری: عملکرد مدل با افزایش طول جمله بهشدت کاهش مییابد
- عدم توانایی در مدلسازی وابستگیهای بلندمدت: ارتباط بین کلمات دور از هم در جمله بهدرستی مدلسازی نمیشود
۲.۲ راهحل: توجه انتخابی به اطلاعات مرتبط
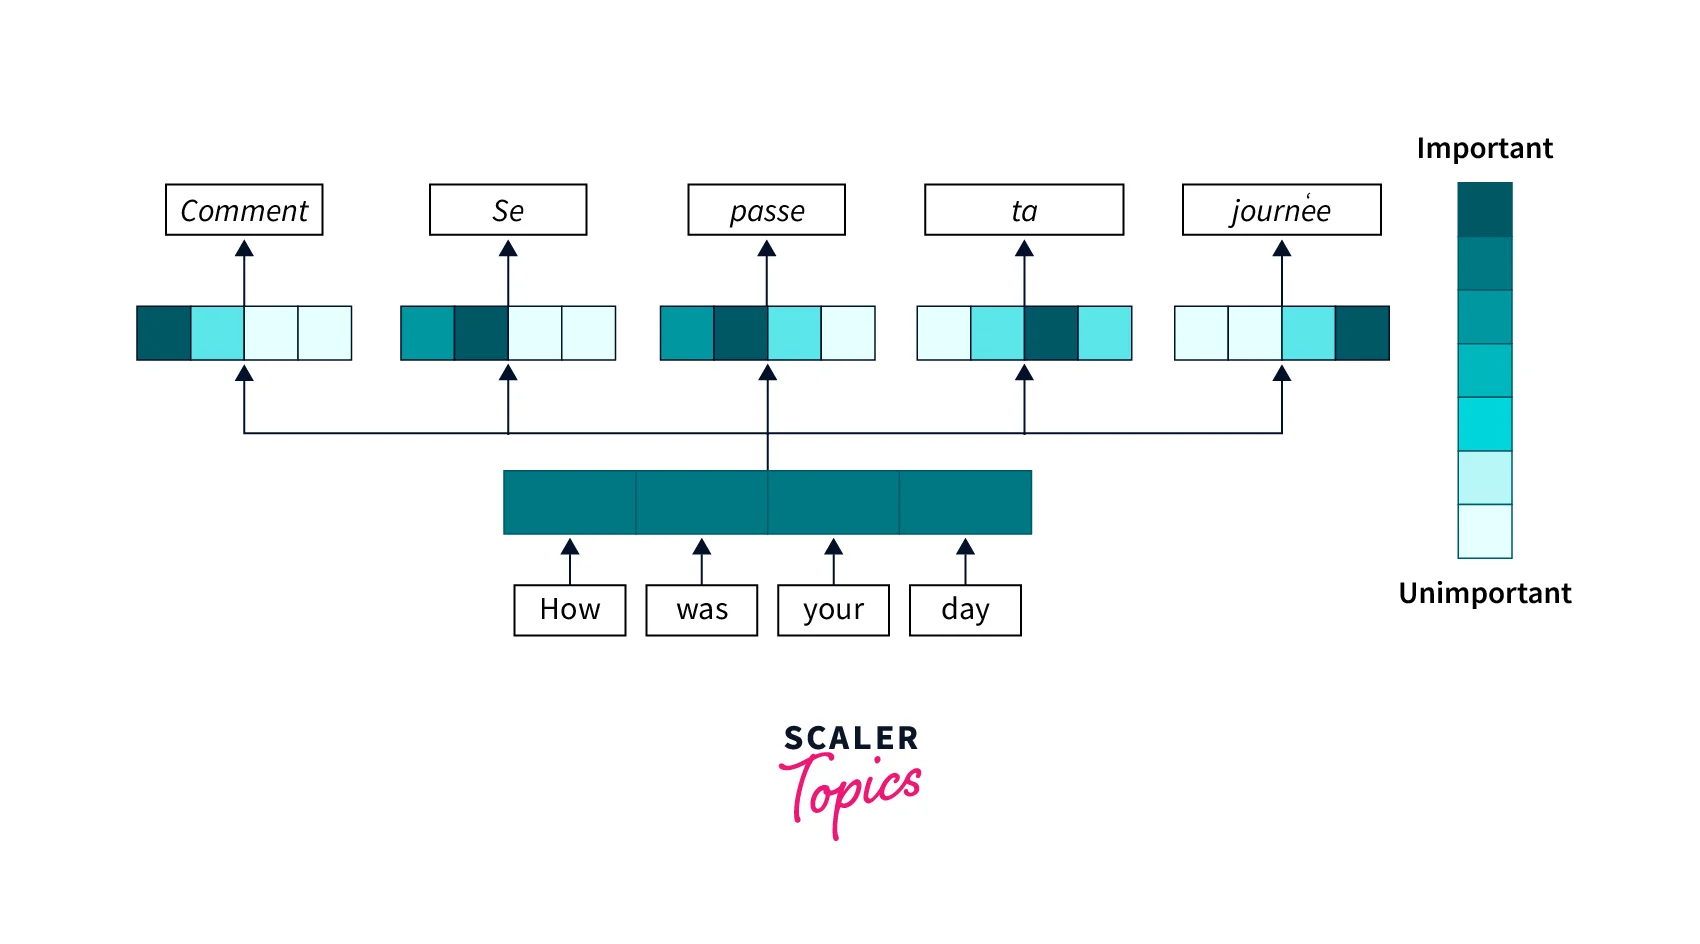
مکانیزم توجه به مدل این امکان را میدهد که در هر گام از پردازش، بهصورت دینامیک به قسمتهای مختلف ورودی وزنهای متفاوتی اختصاص دهد. این رویکرد الهامگرفته از نحوه عملکرد توجه انسانی است که بهطور انتخابی روی جزئیات مهم تمرکز میکند و جزئیات کماهمیتتر را نادیده میگیرد.
۲.۳ تعریف ریاضی کلی
بهطور کلی، مکانیزم توجه یک تابع است که یک Query (پرسوجو) را به مجموعهای از جفتهای Key-Value (کلید-مقدار) نگاشت میکند:
Attention(Q, K, V) = Output
که در آن:
- Query (Q): بردار سؤال یا جستجو که مشخص میکند به دنبال چه اطلاعاتی هستیم
- Key (K): بردارهای کلیدی که نشان میدهند هر عنصر چه اطلاعاتی ارائه میدهد
- Value (V): بردارهای مقدار که حاوی اطلاعات واقعی هستند
- Output: میانگین وزندار از بردارهای Value
۳. ریاضیات مکانیزم توجه
۳.۱ Scaled Dot-Product Attention
سادهترین و پرکاربردترین نوع مکانیزم توجه، Scaled Dot-Product Attention است که در معماری Transformer استفاده میشود. فرمول ریاضی آن بهصورت زیر است:
Attention(Q, K, V) = softmax(QK^T / √d_k) V
این فرمول در چهار گام اساسی محاسبه میشود:
گام ۱: محاسبه امتیازات توجه (Attention Scores)
ابتدا حاصلضرب داخلی (Dot Product) بین Query و Key محاسبه میشود:
Scores = QK^T
این عملیات شباهت بین Query و هر Key را اندازهگیری میکند. هرچه دو بردار مشابهتر باشند، حاصلضرب داخلی آنها بزرگتر است.
گام ۲: مقیاسبندی (Scaling)
امتیازات به دست آمده را بر جذر بعد کلیدها (√d_k) تقسیم میکنیم:
Scaled_Scores = Scores / √d_k
چرا مقیاسبندی ضروری است؟
برای ابعاد بزرگ d_k، حاصلضرب داخلی میتواند مقادیر بسیار بزرگی داشته باشد. فرض کنید عناصر Q و K از توزیع نرمال استاندارد N(0,1) نمونهبرداری شدهاند. در این صورت:
q · k = Σ(q_i × k_i) ~ N(0, d_k)
یعنی واریانس حاصلضرب برابر d_k است. مقادیر بزرگ باعث میشوند تابع softmax به نواحی با گرادیان بسیار کوچک (Vanishing Gradient) برود. با تقسیم بر √d_k، واریانس را به ۱ کاهش میدهیم و پایداری عددی را تضمین میکنیم.
گام ۳: اعمال Softmax
تابع softmax برای تبدیل امتیازات به وزنهای احتمالاتی اعمال میشود:
Attention_Weights = softmax(Scaled_Scores)
تابع softmax تضمین میکند که:
- تمام وزنها مثبت هستند
- مجموع وزنها برابر ۱ است
- وزنهای بزرگتر به امتیازات بالاتر اختصاص مییابند
گام ۴: محاسبه خروجی وزندار
در نهایت، خروجی با ضرب وزنها در Value به دست میآید:
Output = Attention_Weights × V
۳.۲ ماسکگذاری (Masking)
در برخی کاربردها نیاز است از توجه به موقعیتهای خاص جلوگیری شود. دو نوع ماسک رایج عبارتند از:
Padding Mask
برای نادیده گرفتن توکنهای پر کننده (Padding) در دنبالهها:
mask = (input != pad_token) # True برای توکنهای واقعی
scores = scores.masked_fill(mask == 0, float('-inf'))
Look-Ahead Mask (Causal Mask)
برای جلوگیری از دیدن توکنهای آینده در وظایف تولید متن:
mask = torch.triu(torch.ones(seq_len, seq_len), diagonal=1).bool()
scores = scores.masked_fill(mask, float('-inf'))
۴. انواع مکانیزم توجه
۴.۱ Self-Attention
در Self-Attention، Query، Key و Value همگی از یک منبع واحد (ورودی) مشتق میشوند. این به مدل امکان میدهد روابط بین عناصر مختلف یک دنباله را مدلسازی کند.
کاربردها:
- درک زمینه در جملات
- تشخیص ارجاعات ضمیری
- مدلسازی وابستگیهای دوربرد
۴.۲ Cross-Attention
در Cross-Attention، Query از یک منبع و Key-Value از منبع دیگر میآیند. این معمولاً در Decoder برای توجه به خروجی Encoder استفاده میشود.
کاربردها:
- ترجمه ماشینی (توجه جمله منبع به هدف)
- توصیف تصویر (توجه متن به تصویر)
- سؤال و جواب (توجه سؤال به متن)
۴.۳ Multi-Head Attention
Multi-Head Attention به مدل امکان میدهد همزمان به اطلاعات مختلف از فضاهای نمایش متفاوت توجه کند. بهجای یک عملیات توجه، h عملیات توجه موازی انجام میشود:
MultiHead(Q, K, V) = Concat(head_1, ..., head_h) W^O

که head_i = Attention(QW_i^Q, KW_i^K, VW_i^V)
مزایا:
- یادگیری الگوهای متنوعتر
- افزایش ظرفیت مدل
- بهبود کیفیت نمایش
۵. پیادهسازی عملی در PyTorch
در این بخش، پیادهسازی کامل و عملی انواع مکانیزم توجه را ارائه میدهیم.
۵.۱ Scaled Dot-Product Attention
import torch
import torch.nn as nn
import torch.nn.functional as F
import math
class ScaledDotProductAttention(nn.Module):
"""
پیادهسازی Scaled Dot-Product Attention
Args:
dropout: نرخ dropout برای منظمسازی
"""
def __init__(self, dropout=0.1):
super(ScaledDotProductAttention, self).__init__()
self.dropout = nn.Dropout(dropout)
def forward(self, query, key, value, mask=None):
"""
Args:
query: (batch_size, num_queries, d_k)
key: (batch_size, num_keys, d_k)
value: (batch_size, num_keys, d_v)
mask: (batch_size, num_queries, num_keys) یا None
Returns:
output: (batch_size, num_queries, d_v)
attention_weights: (batch_size, num_queries, num_keys)
"""
d_k = query.size(-1)
# گام 1: محاسبه امتیازات - QK^T
scores = torch.matmul(query, key.transpose(-2, -1))
# گام 2: مقیاسبندی - تقسیم بر √d_k
scores = scores / math.sqrt(d_k)
# گام 3: اعمال ماسک (در صورت نیاز)
if mask is not None:
scores = scores.masked_fill(mask == 0, float('-inf'))
# گام 4: اعمال Softmax
attention_weights = F.softmax(scores, dim=-1)
# اعمال Dropout
attention_weights = self.dropout(attention_weights)
# گام 5: محاسبه خروجی وزندار
output = torch.matmul(attention_weights, value)
return output, attention_weights
# مثال استفاده
batch_size = 2
seq_len = 5
d_k = 64
d_v = 64
# تولید دادههای نمونه
query = torch.randn(batch_size, seq_len, d_k)
key = torch.randn(batch_size, seq_len, d_k)
value = torch.randn(batch_size, seq_len, d_v)
# ایجاد مدل
attention = ScaledDotProductAttention(dropout=0.1)
# اجرای Forward Pass
output, weights = attention(query, key, value)
print(f"شکل خروجی: {output.shape}") # (2, 5, 64)
print(f"شکل وزنهای توجه: {weights.shape}") # (2, 5, 5)
۵.۲ Self-Attention Layer
class SelfAttention(nn.Module):
"""
پیادهسازی کامل لایه Self-Attention
"""
def __init__(self, embed_dim, dropout=0.1):
super(SelfAttention, self).__init__()
self.embed_dim = embed_dim
# لایههای خطی برای تبدیل Q, K, V
self.query_proj = nn.Linear(embed_dim, embed_dim)
self.key_proj = nn.Linear(embed_dim, embed_dim)
self.value_proj = nn.Linear(embed_dim, embed_dim)
# لایه توجه
self.attention = ScaledDotProductAttention(dropout)
# لایه خروجی
self.output_proj = nn.Linear(embed_dim, embed_dim)
def forward(self, x, mask=None):
"""
Args:
x: (batch_size, seq_len, embed_dim)
mask: ماسک اختیاری
Returns:
output: (batch_size, seq_len, embed_dim)
attention_weights: وزنهای توجه
"""
# تولید Query, Key, Value از ورودی
query = self.query_proj(x)
key = self.key_proj(x)
value = self.value_proj(x)
# اعمال توجه
attn_output, attention_weights = self.attention(query, key, value, mask)
# پروجکشن نهایی
output = self.output_proj(attn_output)
return output, attention_weights
# مثال استفاده
embed_dim = 128
seq_len = 10
batch_size = 4
x = torch.randn(batch_size, seq_len, embed_dim)
self_attn = SelfAttention(embed_dim)
output, weights = self_attn(x)
print(f"خروجی مدل ترجمه: {output.shape}")
۶.۲ طبقهبندی متن با Self-Attention
class TextClassifierWithAttention(nn.Module):
"""
مدل طبقهبندی متن با استفاده از Self-Attention
"""
def __init__(self, vocab_size, embed_dim, num_heads, num_classes,
max_len=512, dropout=0.1):
super(TextClassifierWithAttention, self).__init__()
self.embedding = nn.Embedding(vocab_size, embed_dim)
self.pos_encoding = self._create_positional_encoding(max_len, embed_dim)
# لایههای Self-Attention
self.attention1 = MultiHeadAttention(embed_dim, num_heads, dropout)
self.attention2 = MultiHeadAttention(embed_dim, num_heads, dropout)
self.norm1 = nn.LayerNorm(embed_dim)
self.norm2 = nn.LayerNorm(embed_dim)
# لایههای طبقهبندی
self.classifier = nn.Sequential(
nn.Linear(embed_dim, embed_dim // 2),
nn.ReLU(),
nn.Dropout(dropout),
nn.Linear(embed_dim // 2, num_classes)
)
self.dropout = nn.Dropout(dropout)
def _create_positional_encoding(self, max_len, embed_dim):
pe = torch.zeros(max_len, embed_dim)
position = torch.arange(0, max_len).unsqueeze(1).float()
div_term = torch.exp(torch.arange(0, embed_dim, 2).float() *
-(math.log(10000.0) / embed_dim))
pe[:, 0::2] = torch.sin(position * div_term)
pe[:, 1::2] = torch.cos(position * div_term)
return pe.unsqueeze(0)
def forward(self, x, mask=None):
"""
Args:
x: (batch_size, seq_len) - ایندکسهای توکن
mask: ماسک padding
Returns:
logits: (batch_size, num_classes)
"""
# Embedding
x = self.embedding(x)
seq_len = x.size(1)
x = x + self.pos_encoding[:, :seq_len, :].to(x.device)
x = self.dropout(x)
# لایه اول Self-Attention
attn_out1, _ = self.attention1(x, x, x, mask)
x = self.norm1(x + attn_out1)
# لایه دوم Self-Attention
attn_out2, _ = self.attention2(x, x, x, mask)
x = self.norm2(x + attn_out2)
# Global Average Pooling
if mask is not None:
mask_expanded = mask.unsqueeze(-1).float()
x = (x * mask_expanded).sum(dim=1) / mask_expanded.sum(dim=1)
else:
x = x.mean(dim=1)
# طبقهبندی
logits = self.classifier(x)
return logits
# مثال استفاده برای طبقهبندی احساسات
vocab_size = 15000
embed_dim = 256
num_heads = 8
num_classes = 3 # مثبت، منفی، خنثی
batch_size = 8
seq_len = 128
# دادههای نمونه
texts = torch.randint(0, vocab_size, (batch_size, seq_len))
labels = torch.randint(0, num_classes, (batch_size,))
# ایجاد مدل
classifier = TextClassifierWithAttention(vocab_size, embed_dim,
num_heads, num_classes)
# Forward pass
logits = classifier(texts)
print(f"خروجی طبقهبندی: {logits.shape}") # (8, 3)
# محاسبه دقت
predictions = logits.argmax(dim=-1)
accuracy = (predictions == labels).float().mean()
print(f"دقت: {accuracy.item():.2%}")
۶.۳ Vision Transformer – کاربرد در بینایی ماشین
class PatchEmbedding(nn.Module):
"""
تبدیل تصویر به Patch Embeddings
"""
def __init__(self, img_size=224, patch_size=16, in_channels=3, embed_dim=768):
super(PatchEmbedding, self).__init__()
self.img_size = img_size
self.patch_size = patch_size
self.num_patches = (img_size // patch_size) ** 2
# Convolution برای استخراج patches
self.projection = nn.Conv2d(in_channels, embed_dim,
kernel_size=patch_size, stride=patch_size)
def forward(self, x):
"""
Args:
x: (batch_size, channels, height, width)
Returns:
(batch_size, num_patches, embed_dim)
"""
x = self.projection(x) # (batch, embed_dim, h/p, w/p)
x = x.flatten(2) # (batch, embed_dim, num_patches)
x = x.transpose(1, 2) # (batch, num_patches, embed_dim)
return x
class VisionTransformer(nn.Module):
"""
Vision Transformer برای طبقهبندی تصویر
"""
def __init__(self, img_size=224, patch_size=16, in_channels=3,
num_classes=1000, embed_dim=768, num_heads=12,
num_layers=12, ff_dim=3072, dropout=0.1):
super(VisionTransformer, self).__init__()
# Patch Embedding
self.patch_embed = PatchEmbedding(img_size, patch_size,
in_channels, embed_dim)
# Class Token
self.cls_token = nn.Parameter(torch.randn(1, 1, embed_dim))
# Positional Embedding
num_patches = self.patch_embed.num_patches
self.pos_embed = nn.Parameter(torch.randn(1, num_patches + 1, embed_dim))
# Transformer Encoder Blocks
self.encoder_blocks = nn.ModuleList([
TransformerEncoderBlock(embed_dim, num_heads, ff_dim, dropout)
for _ in range(num_layers)
])
# Classification Head
self.norm = nn.LayerNorm(embed_dim)
self.head = nn.Linear(embed_dim, num_classes)
self.dropout = nn.Dropout(dropout)
def forward(self, x):
"""
Args:
x: (batch_size, channels, height, width)
Returns:
logits: (batch_size, num_classes)
"""
batch_size = x.size(0)
# تبدیل به patches
x = self.patch_embed(x) # (batch, num_patches, embed_dim)
# اضافه کردن class token
cls_tokens = self.cls_token.expand(batch_size, -1, -1)
x = torch.cat([cls_tokens, x], dim=1)
# اضافه کردن positional embedding
x = x + self.pos_embed
x = self.dropout(x)
# عبور از encoder blocks
for block in self.encoder_blocks:
x = block(x)
# استفاده از class token برای طبقهبندی
x = self.norm(x[:, 0])
logits = self.head(x)
return logits
# مثال استفاده
img_size = 224
patch_size = 16
num_classes = 10 # مثلاً CIFAR-10
batch_size = 4
# تصاویر نمونه
images = torch.randn(batch_size, 3, img_size, img_size)
# ایجاد مدل (نسخه کوچک)
vit = VisionTransformer(
img_size=img_size,
patch_size=patch_size,
num_classes=num_classes,
embed_dim=384,
num_heads=6,
num_layers=6,
ff_dim=1536
)
# پیشبینی
logits = vit(images)
print(f"خروجی Vision Transformer: {logits.shape}") # (4, 10)
۷. بهینهسازی و نکات پیشرفته
۷.۱ بهینهسازی حافظه با Gradient Checkpointing
برای مدلهای بزرگ، میتوان از Gradient Checkpointing استفاده کرد:
from torch.utils.checkpoint import checkpoint

class EfficientTransformerBlock(nn.Module):
    def __init__(self, embed_dim, num_heads, ff_dim, use_checkpoint=True):
        super(EfficientTransformerBlock, self).__init__()
        self.use_checkpoint = use_checkpoint
        self.attention = MultiHeadAttention(embed_dim, num_heads)
        self.ff_network = nn.Sequential(
            nn.Linear(embed_dim, ff_dim),
            nn.GELU(),
            nn.Linear(ff_dim, embed_dim)
        )
        self.norm1 = nn.LayerNorm(embed_dim)
        self.norm2 = nn.LayerNorm(embed_dim)

    def _forward(self, x):
        attn_out, _ = self.attention(x, x, x)
        x = self.norm1(x + attn_out)
        ff_out = self.ff_network(x)
        x = self.norm2(x + ff_out)
        return x

    def forward(self, x):
        if self.use_checkpoint and self.training:
            return checkpoint(self._forward, x)
        return self._forward(x)
۷.۲ Flash Attention برای سرعت بالاتر
استفاده از پیادهسازی بهینه Flash Attention:
# نصب: pip install flash-attn
try:
    from flash_attn import flash_attn_func
    FLASH_AVAILABLE = True
except ImportError:
    FLASH_AVAILABLE = False

class OptimizedAttention(nn.Module):
    def __init__(self, embed_dim, num_heads, use_flash=True):
        super(OptimizedAttention, self).__init__()
        self.embed_dim = embed_dim
        self.num_heads = num_heads
        self.head_dim = embed_dim // num_heads
        self.use_flash = use_flash and FLASH_AVAILABLE

        self.qkv_proj = nn.Linear(embed_dim, 3 * embed_dim)
        self.out_proj = nn.Linear(embed_dim, embed_dim)

    def forward(self, x):
        batch_size, seq_len, _ = x.shape

        # پروجکت Q, K, V همزمان
        qkv = self.qkv_proj(x)
        qkv = qkv.reshape(batch_size, seq_len, 3, self.num_heads, self.head_dim)
        qkv = qkv.permute(2, 0, 3, 1, 4)  # (3, batch, heads, seq, head_dim)
        q, k, v = qkv[0], qkv[1], qkv[2]

        if self.use_flash and self.training:
            # استفاده از Flash Attention
            out = flash_attn_func(q, k, v, causal=False)
        else:
            # Attention استاندارد
            scores = torch.matmul(q, k.transpose(-2, -1)) / math.sqrt(self.head_dim)
            attn = F.softmax(scores, dim=-1)
            out = torch.matmul(attn, v)

        # ترکیب سرها
        out = out.transpose(1, 2).reshape(batch_size, seq_len, self.embed_dim)
        out = self.out_proj(out)

        return out
۷.۳ Relative Position Encoding
پیادهسازی Relative Position Encoding برای عملکرد بهتر:
class RelativePositionAttention(nn.Module):
"""
Self-Attention با Relative Position Encoding
"""
def __init__(self, embed_dim, num_heads, max_relative_position=128):
super(RelativePositionAttention, self).__init__()
self.embed_dim = embed_dim
self.num_heads = num_heads
self.head_dim = embed_dim // num_heads
self.max_relative_position = max_relative_position
self.qkv_proj = nn.Linear(embed_dim, 3 * embed_dim)
self.out_proj = nn.Linear(embed_dim, embed_dim)
# Relative Position Embeddings
self.relative_positions_embeddings = nn.Embedding(
2 * max_relative_position + 1, self.head_dim
)
def _get_relative_positions(self, seq_len):
"""محاسبه ماتریس موقعیتهای نسبی"""
range_vec = torch.arange(seq_len)
distance_mat = range_vec[None, :] - range_vec[:, None]
distance_mat_clipped = torch.clamp(
distance_mat, -self.max_relative_position, self.max_relative_position
)
final_mat = distance_mat_clipped + self.max_relative_position
return final_mat
def forward(self, x):
batch_size, seq_len, _ = x.shape
# Q, K, V projection
qkv = self.qkv_proj(x)
qkv = qkv.reshape(batch_size, seq_len, 3, self.num_heads, self.head_dim)
qkv = qkv.permute(2, 0, 3, 1, 4)
q, k, v = qkv[0], qkv[1], qkv[2]
# محاسبه attention scores
scores = torch.matmul(q, k.transpose(-2, -1)) / math.sqrt(self.head_dim)
# اضافه کردن relative position bias
relative_positions = self._get_relative_positions(seq_len).to(x.device)
relative_embeddings = self.relative_positions_embeddings(relative_positions)
# محاسبه relative position scores
relative_scores = torch.einsum('bhqd,qkd->bhqk', q, relative_embeddings)
scores = scores + relative_scores
# Softmax و محاسبه خروجی
attn = F.softmax(scores, dim=-1)
out = torch.matmul(attn, v)
# ترکیب سرها
out = out.transpose(1, 2).reshape(batch_size, seq_len, self.embed_dim)
out = self.out_proj(out)
return out
۷.۴ Mixed Precision Training
استفاده از Automatic Mixed Precision برای تسریع آموزش:
import torch
from torch.cuda.amp import autocast, GradScaler

def train_with_amp(model, train_loader, optimizer, device, num_epochs):
    """
    آموزش با Mixed Precision
    """
    scaler = GradScaler()
    model.to(device)

    for epoch in range(num_epochs):
        model.train()
        total_loss = 0

        for batch_idx, (data, target) in enumerate(train_loader):
            data, target = data.to(device), target.to(device)

            optimizer.zero_grad()

            # Forward pass با autocast
            with autocast():
                output = model(data)
                loss = F.cross_entropy(output, target)

            # Backward pass با gradient scaling
            scaler.scale(loss).backward()
            scaler.step(optimizer)
            scaler.update()

            total_loss += loss.item()

            if batch_idx % 100 == 0:
                print(f'Epoch: {epoch}, Batch: {batch_idx}, Loss: {loss.item():.4f}')

        avg_loss = total_loss / len(train_loader)
        print(f'Epoch {epoch} completed. Average Loss: {avg_loss:.4f}')


# مثال استفاده
device = torch.device('cuda' if torch.cuda.is_available() else 'cpu')
model = VisionTransformer(num_classes=10)
optimizer = torch.optim.AdamW(model.parameters(), lr=1e-4)

# فرض کنید train_loader آماده است
# train_with_amp(model, train_loader, optimizer, device, num_epochs=10)
۷.۵ تنظیمات Hyperparameter
جدول پیشنهادی hyperparameters برای کاربردهای مختلف:
# تنظیمات پیشنهادی

# مدل کوچک - برای منابع محدود
SMALL_CONFIG = {
    'embed_dim': 256,
    'num_heads': 4,
    'num_layers': 4,
    'ff_dim': 1024,
    'dropout': 0.1,
    'learning_rate': 1e-4,
    'batch_size': 32
}

# مدل متوسط - برای کاربردهای عمومی
MEDIUM_CONFIG = {
    'embed_dim': 512,
    'num_heads': 8,
    'num_layers': 6,
    'ff_dim': 2048,
    'dropout': 0.1,
    'learning_rate': 5e-5,
    'batch_size': 16
}

# مدل بزرگ - برای دقت بالا
LARGE_CONFIG = {
    'embed_dim': 768,
    'num_heads': 12,
    'num_layers': 12,
    'ff_dim': 3072,
    'dropout': 0.1,
    'learning_rate': 3e-5,
    'batch_size': 8
}


def create_model_from_config(config, num_classes):
    """ساخت مدل بر اساس configuration"""
    model = TextClassifierWithAttention(
        vocab_size=30000,
        embed_dim=config['embed_dim'],
        num_heads=config['num_heads'],
        num_classes=num_classes,
        dropout=config['dropout']
    )

    optimizer = torch.optim.AdamW(
        model.parameters(),
        lr=config['learning_rate'],
        weight_decay=0.01
    )

    return model, optimizer


# استفاده
model, optimizer = create_model_from_config(MEDIUM_CONFIG, num_classes=5)
print(f"تعداد کل پارامترها: {sum(p.numel() for p in model.parameters()):,}")
۸. ارزیابی و تست مدل
۸.۱ تابع ارزیابی کامل
def evaluate_model(model, test_loader, device, return_attention=False):
"""
ارزیابی جامع مدل
Args:
model: مدل آموزشدیده
test_loader: DataLoader دادههای تست
device: دستگاه (CPU/GPU)
return_attention: برگرداندن وزنهای توجه
Returns:
metrics: دیکشنری شامل معیارهای ارزیابی
"""
model.eval()
model.to(device)
total_loss = 0
correct = 0
total = 0
all_predictions = []
all_labels = []
attention_weights_list = []
with torch.no_grad():
for data, target in test_loader:
data, target = data.to(device), target.to(device)
output = model(data)
loss = F.cross_entropy(output, target)
total_loss += loss.item()
pred = output.argmax(dim=1)
correct += (pred == target).sum().item()
total += target.size(0)
all_predictions.extend(pred.cpu().numpy())
all_labels.extend(target.cpu().numpy())
accuracy = 100. * correct / total
avg_loss = total_loss / len(test_loader)
# محاسبه معیارهای اضافی
from sklearn.metrics import precision_recall_fscore_support, confusion_matrix
precision, recall, f1, _ = precision_recall_fscore_support(
all_labels, all_predictions, average='weighted'
)
cm = confusion_matrix(all_labels, all_predictions)
metrics = {
'accuracy': accuracy,
'loss': avg_loss,
'precision': precision,
'recall': recall,
'f1_score': f1,
'confusion_matrix': cm
}
return metrics
def visualize_attention(model, text, tokenizer, device, layer_idx=0):
"""
تجسم وزنهای توجه
Args:
model: مدل آموزشدیده
text: متن ورودی
tokenizer: tokenizer برای تبدیل متن
device: دستگاه
layer_idx: اندیس لایه برای تجسم
"""
import matplotlib.pyplot as plt
import seaborn as sns
model.eval()
model.to(device)
# Tokenize
tokens = tokenizer.encode(text)
input_tensor = torch.tensor([tokens]).to(device)
# استخراج attention weights
with torch.no_grad():
# باید مدل را طوری تغییر دهیم که attention weights را برگرداند
# این بستگی به ساختار دقیق مدل دارد
pass
# تجسم با heatmap
plt.figure(figsize=(10, 8))
sns.heatmap(attention_weights[0, 0].cpu().numpy(),
xticklabels=tokens, yticklabels=tokens,
cmap='viridis', cbar=True)
plt.title(f'Attention Weights - Layer {layer_idx}')
plt.xlabel('Key Position')
plt.ylabel('Query Position')
plt.tight_layout()
plt.savefig('attention_visualization.png', dpi=300)
plt.show()
۸.۲ مثال کامل آموزش و ارزیابی
# اسکریپت کامل آموزش
def complete_training_pipeline():
"""
پایپلاین کامل آموزش و ارزیابی
"""
# تنظیمات
device = torch.device('cuda' if torch.cuda.is_available() else 'cpu')
print(f"استفاده از دستگاه: {device}")
# ساخت مدل
model = TextClassifierWithAttention(
vocab_size=10000,
embed_dim=256,
num_heads=8,
num_classes=3
).to(device)
print(f"تعداد پارامترها: {sum(p.numel() for p in model.parameters()):,}")
# Optimizer و Scheduler
optimizer = torch.optim.AdamW(model.parameters(), lr=3e-4, weight_decay=0.01)
scheduler = torch.optim.lr_scheduler.CosineAnnealingLR(optimizer, T_max=100)
# فرض: دادهها آماده شدهاند
# train_loader = ...
# val_loader = ...
best_val_accuracy = 0
patience = 5
patience_counter = 0
num_epochs = 50
for epoch in range(num_epochs):
# آموزش
model.train()
train_loss = 0
train_correct = 0
train_total = 0
# برای هر batch در train_loader:
# ... (کد آموزش)
print(f'Epoch {epoch+1}/{num_epochs}')
print(f'Train Loss: {train_loss:.4f}, Train Acc: {train_correct/train_total:.2%}')
# ارزیابی
val_metrics = evaluate_model(model, val_loader, device)
print(f"Val Accuracy: {val_metrics['accuracy']:.2f}%")
print(f"Val F1-Score: {val_metrics['f1_score']:.4f}")
# ذخیره بهترین مدل
if val_metrics['accuracy'] > best_val_accuracy:
best_val_accuracy = val_metrics['accuracy']
torch.save({
'epoch': epoch,
'model_state_dict': model.state_dict(),
'optimizer_state_dict': optimizer.state_dict(),
'accuracy': best_val_accuracy,
}, 'best_model.pt')
patience_counter = 0
else:
patience_counter += 1
# Early Stopping
if patience_counter >= patience:
print(f"Early stopping در epoch {epoch+1}")
break
scheduler.step()
print(f"بهترین دقت validation: {best_val_accuracy:.2f}%")
# بارگذاری بهترین مدل
checkpoint = torch.load('best_model.pt')
model.load_state_dict(checkpoint['model_state_dict'])
return model
۹. مقایسه عملکرد و Benchmarking
۹.۱ مقایسه انواع Attention
import time
def benchmark_attention_mechanisms():
"""
مقایسه سرعت و حافظه انواع مختلف attention
"""
device = torch.device('cuda' if torch.cuda.is_available() else 'cpu')
batch_size = 16
seq_len = 512
embed_dim = 512
num_heads = 8
x = torch.randn(batch_size, seq_len, embed_dim).to(device)
mechanisms = {
'Self-Attention': SelfAttention(embed_dim),
'Multi-Head Attention': MultiHeadAttention(embed_dim, num_heads),
'Relative Position Attention': RelativePositionAttention(embed_dim, num_heads)
}
results = {}
for name, mechanism in mechanisms.items():
mechanism = mechanism.to(device)
mechanism.eval()
# Warmup
with torch.no_grad():
for _ in range(10):
if 'Multi-Head' in name:
_ = mechanism(x, x, x)
else:
_ = mechanism(x)
# Timing
torch.cuda.synchronize() if torch.cuda.is_available() else None
start_time = time.time()
with torch.no_grad():
for _ in range(100):
if 'Multi-Head' in name:
output = mechanism(x, x, x)
else:
output = mechanism(x)
torch.cuda.synchronize() if torch.cuda.is_available() else None
end_time = time.time()
avg_time = (end_time - start_time) / 100
# حافظه
if torch.cuda.is_available():
memory = torch.cuda.max_memory_allocated() / 1024**2 # MB
torch.cuda.reset_peak_memory_stats()
else:
memory = 0
results[name] = {
'avg_time_ms': avg_time * 1000,
'memory_mb': memory,
'params': sum(p.numel() for p in mechanism.parameters())
}
# چاپ نتایج
print("\n" + "="*70)
print("مقایسه عملکرد مکانیزمهای Attention")
print("="*70)
print(f"{'مکانیزم':<30} {'زمان (ms)':<15} {'حافظه (MB)':<15} {'پارامترها':<15}")
print("-"*70)
for name, metrics in results.items():
print(f"{name:<30} {metrics['avg_time_ms']:<15.2f} "
f"{metrics['memory_mb']:<15.1f} {metrics['params']:<15,}")
print("="*70)
return results
# اجرای benchmark
# results = benchmark_attention_mechanisms()
۱۰. نکات عملی و Best Practices
۱۰.۱ مدیریت Overfitting
class AttentionWithRegularization(nn.Module):
"""
Attention با تکنیکهای منظمسازی
"""
def __init__(self, embed_dim, num_heads, dropout=0.1,
attention_dropout=0.1, use_layer_drop=False):
super(AttentionWithRegularization, self).__init__()
self.attention = MultiHeadAttention(embed_dim, num_heads, attention_dropout)
self.dropout = nn.Dropout(dropout)
self.use_layer_drop = use_layer_drop
self.layer_drop_prob = 0.1
def forward(self, x):
# Layer Dropout: تصادفی skip کردن لایه
if self.use_layer_drop and self.training:
if torch.rand(1).item() < self.layer_drop_prob:
return x
out, _ = self.attention(x, x, x)
out = self.dropout(out)
return x + out # Residual connection
# تکنیکهای منظمسازی دیگر:
# 1. Label Smoothing
class LabelSmoothingCrossEntropy(nn.Module):
def __init__(self, smoothing=0.1):
super().__init__()
self.smoothing = smoothing
def forward(self, pred, target):
n_class = pred.size(1)
one_hot = torch.zeros_like(pred).scatter(1, target.unsqueeze(1), 1)
one_hot = one_hot * (1 - self.smoothing) + self.smoothing / n_class
log_prob = F.log_softmax(pred, dim=1)
loss = -(one_hot * log_prob).sum(dim=1).mean()
return loss
# 2. Weight Decay با تنظیم خاص
def configure_optimizers(model, learning_rate, weight_decay):
"""
تنظیم optimizer با decay متفاوت برای پارامترهای مختلف
"""
# پارامترهایی که نباید decay شوند
no_decay = ['bias', 'LayerNorm.weight', 'norm']
optimizer_grouped_parameters = [
{
'params': [p for n, p in model.named_parameters()
if not any(nd in n for nd in no_decay)],
'weight_decay': weight_decay
},
{
'params': [p for n, p in model.named_parameters()
if any(nd in n for nd in no_decay)],
'weight_decay': 0.0
}
]
optimizer = torch.optim.AdamW(optimizer_grouped_parameters, lr=learning_rate)
return optimizer
۱۰.۲ نکات debugging
def debug_attention_mechanism(model, sample_input, device):
    """
    تابع کمکی برای debug کردن attention
    """
    model.eval()
    model.to(device)
    sample_input = sample_input.to(device)

    print("="*50)
    print("Debug Information")
    print("="*50)

    # بررسی شکل ورودی
    print(f"Input shape: {sample_input.shape}")

    # Hook برای capture کردن activations
    activations = {}

    def get_activation(name):
        def hook(model, input, output):
            activations[name] = output.detach()
        return hook

    # ثبت hooks
    for name, module in model.named_modules():
        if isinstance(module, MultiHeadAttention):
            module.register_forward_hook(get_activation(name))

    # Forward pass
    with torch.no_grad():
        output = model(sample_input)

    print(f"Output shape: {output.shape}")

    # بررسی activations
    for name, activation in activations.items():
        print(f"\n{name}:")
        print(f"  Shape: {activation.shape}")
        print(f"  Mean: {activation.mean().item():.4f}")
        print(f"  Std: {activation.std().item():.4f}")
        print(f"  Min: {activation.min().item():.4f}")
        print(f"  Max: {activation.max().item():.4f}")

        # بررسی NaN یا Inf
        if torch.isnan(activation).any():
            print(f"  ⚠️ WARNING: NaN detected!")
        if torch.isinf(activation).any():
            print(f"  ⚠️ WARNING: Inf detected!")

    print("="*50)


# بررسی gradient flow
def check_gradient_flow(model):
    """
    بررسی جریان گرادیان در مدل
    """
    import matplotlib.pyplot as plt

    ave_grads = []
    max_grads = []
    layers = []

    for n, p in model.named_parameters():
        if p.requires_grad and p.grad is not None:
            layers.append(n)
            ave_grads.append(p.grad.abs().mean().item())
            max_grads.append(p.grad.abs().max().item())

    plt.figure(figsize=(12, 6))
    plt.bar(np.arange(len(max_grads)), max_grads, alpha=0.5, label="Max Gradient")
    plt.bar(np.arange(len(ave_grads)), ave_grads, alpha=0.5, label="Mean Gradient")
    plt.hlines(0, 0, len(ave_grads)+1, linewidth=2, color="k")
    plt.xticks(range(0, len(ave_grads), 1), layers, rotation="vertical")
    plt.xlim(left=0, right=len(ave_grads))
    plt.ylim(bottom=-0.001, top=0.02)
    plt.xlabel("Layers")
    plt.ylabel("Gradient")
    plt.title("Gradient Flow")
    plt.legend()
    plt.grid(True)
    plt.tight_layout()
    plt.savefig('gradient_flow.png')
    plt.show()
۱۱. کاربردهای پیشرفته
۱۱.۱ Cross-Modal Attention (تصویر-متن)
class CrossModalAttention(nn.Module):
"""
Attention برای ترکیب اطلاعات تصویر و متن
"""
def __init__(self, img_embed_dim, text_embed_dim, num_heads, dropout=0.1):
super(CrossModalAttention, self).__init__()
# پروجکشن به فضای مشترک
self.img_proj = nn.Linear(img_embed_dim, text_embed_dim)
# Cross-Attention: Query از متن، Key/Value از تصویر
self.cross_attention = MultiHeadAttention(
text_embed_dim, num_heads, dropout
)
self.norm = nn.LayerNorm(text_embed_dim)
def forward(self, text_features, img_features):
"""
Args:
text_features: (batch, text_len, text_embed_dim)
img_features: (batch, img_patches, img_embed_dim)
Returns:
fused_features: (batch, text_len, text_embed_dim)
"""
# پروجکت تصویر به فضای متن
img_proj = self.img_proj(img_features)
# Cross-Attention: متن به تصویر توجه میکند
attended_features, attn_weights = self.cross_attention(
query=text_features,
key=img_proj,
value=img_proj
)
# Residual + Norm
output = self.norm(text_features + attended_features)
return output, attn_weights
class ImageTextMatcher(nn.Module):
"""
مدل برای تطبیق تصویر-متن با Cross-Modal Attention
"""
def __init__(self, img_embed_dim=768, text_embed_dim=512, num_heads=8):
super(ImageTextMatcher, self).__init__()
# Image encoder (فرض: از ViT استفاده میکنیم)
self.img_encoder = PatchEmbedding(embed_dim=img_embed_dim)
# Text encoder (فرض: Embedding layer)
self.text_encoder = nn.Embedding(30000, text_embed_dim)
# Cross-Modal Attention
self.cross_modal_attn = CrossModalAttention(
img_embed_dim, text_embed_dim, num_heads
)
# Classification head
self.classifier = nn.Linear(text_embed_dim, 1)
def forward(self, images, texts):
"""
Args:
images: (batch, 3, H, W)
texts: (batch, seq_len)
Returns:
scores: (batch,) - امتیاز تطبیق
"""
# Encode تصویر و متن
img_features = self.img_encoder(images)
text_features = self.text_encoder(texts)
# Cross-Modal fusion
fused_features, _ = self.cross_modal_attn(text_features, img_features)
# Global pooling
pooled = fused_features.mean(dim=1)
# پیشبینی امتیاز تطبیق
scores = self.classifier(pooled).squeeze(-1)
return torch.sigmoid(scores)
۱۱.۲ Sparse Attention برای دنبالههای بلند
class SparseAttention(nn.Module):
"""
Sparse Attention برای کاهش پیچیدگی O(n²) به O(n√n)
"""
def __init__(self, embed_dim, num_heads, block_size=64, dropout=0.1):
super(SparseAttention, self).__init__()
self.embed_dim = embed_dim
self.num_heads = num_heads
self.head_dim = embed_dim // num_heads
self.block_size = block_size
self.qkv_proj = nn.Linear(embed_dim, 3 * embed_dim)
self.out_proj = nn.Linear(embed_dim, embed_dim)
self.dropout = nn.Dropout(dropout)
def _create_sparse_mask(self, seq_len, device):
"""
ایجاد ماسک برای sparse attention pattern
"""
mask = torch.zeros(seq_len, seq_len, device=device)
# Local attention: هر توکن به block_size توکن اطراف خود توجه میکند
for i in range(seq_len):
start = max(0, i - self.block_size // 2)
end = min(seq_len, i + self.block_size // 2)
mask[i, start:end] = 1
# Strided attention: توجه به توکنهای در فواصل منظم
stride = self.block_size
for i in range(seq_len):
mask[i, ::stride] = 1
return mask
def forward(self, x):
batch_size, seq_len, _ = x.shape
# Q, K, V
qkv = self.qkv_proj(x)
qkv = qkv.reshape(batch_size, seq_len, 3, self.num_heads, self.head_dim)
qkv = qkv.permute(2, 0, 3, 1, 4)
q, k, v = qkv[0], qkv[1], qkv[2]
# محاسبه scores
scores = torch.matmul(q, k.transpose(-2, -1)) / math.sqrt(self.head_dim)
# اعمال sparse mask
sparse_mask = self._create_sparse_mask(seq_len, x.device)
scores = scores.masked_fill(sparse_mask.unsqueeze(0).unsqueeze(0) == 0, float('-inf'))
# Softmax و output
attn = F.softmax(scores, dim=-1)
attn = self.dropout(attn)
out = torch.matmul(attn, v)
# ترکیب سرها
out = out.transpose(1, 2).reshape(batch_size, seq_len, self.embed_dim)
out = self.out_proj(out)
return out
۱۲. نتیجهگیری
مکانیزم توجه به ابزاری ضروری در جعبهابزار هر محقق و مهندس یادگیری عمیق تبدیل شده است. درک عمیق این مکانیزم و توانایی پیادهسازی صحیح آن در PyTorch، پایهای محکم برای کار با مدلهای پیشرفتهتر فراهم میکند.
کدهای ارائهشده در این مقاله بهعنوان نقطه شروعی برای پروژههای شما عمل میکنند. توصیه میشود با تغییر hyperparameterها، آزمایش با معماریهای مختلف و اعمال تکنیکهای بهینهسازی، درک عملی خود را عمیقتر کنید.
یادگیری عمیق حوزهای پویا و در حال تحول است. مکانیزم توجه نه تنها امروز مهم است، بلکه پایهگذار نوآوریهای آینده نیز خواهد بود.